BRAZOS VALLEY A's
Model A Club
Repairing Model A Brakes
By Bob Hensz
Now here is a very familiar sign to all drivers, and especially to us Model A'ers who are extra cautious as we approach these as we watch to see if others on the cross streets are to stop or not. Sometimes though we have slid through because we did not see the sign hidden in the trees, or something distracted us. In other cases, we really wanted to stop, but with the brake pedal on the floor, the old Model A slowed down a bit but then sailed straight through, coming to its stop somewhere past the sign. This was my experience during the MACFA National Tour in April this year.
Everything started out just fine - an enjoyable drive to the first stopping place and the beginning of the tour, but as the time went on, I noticed some difficulty stopping. I first noticed it coming down some very steep hills on some of the back roads; however, I convinced myself it was the steepness of the hill.
Then in Kerrville on the way to dinner, I smoothly sailed through a stop light and ended up about half a car length into the intersection - OOPS! For the rest of the tour I tried to take it easy on the brakes and slow down plenty early, still, in San Marcos on the way home I again ended up further into the intersection than I wanted.
After arriving home, I pulled out the books and read up on brakes, then began tearing into it. First problem was the rear hubs.
The left and right were not the same type and after breaking two 3-jaw pullers, I called Norm Cumings and arranged to borrow his puller.
This enabled me to get one of the hubs and drums off. I also placed an order for both types of pullers (if you need to borrow one, let me know.) As a note, the rear hub are very hard to pull, so you need a puller and as Norm pointed out, a long crow bar angled between the studs allows you to place the pressure you need on the bolt to get the hub pulled.
I then pulled the front drums which was a breeze. Of course, as anyone with a Model A knows, we could quote Forrest Gump with "Life's like a box of chocolates." Sure enough I saw some brake parts not in the books nor in the ads. So off went pictures to some BVA'ers - to which Mike Murphy responded that it looked like some type of floater system. Seems that no one had seen this type of system.
But all seemed to agree they were not the problem, so I decided to retain them and press ahead.
In all the reading I did, authors consistently made a point of cautioning about the thickness of the drums. When Henry originally built the Model A, the drums were stamped steel - not the cast iron we are used to (for anyone who has worked on a 50s or 60s model car or looked at one of the newer ones with drums). Originally they were 140 thousands thick and could be turned - but only down to 110 thousands. Below 110 they become unsafe because they can heat up and expand, with the result the linings do not make good contact. Now there are bands which you can heat up to expand them and drive them around the drum, but this does take away from the appearance - and to me that seemed like a Band-Aid on a hemorrhage. I took a micrometer to mine and discovered one rear one was at 100 thousands. I then did a front and it too was at 100. The other front was about 140 - hmmm. The more I looked it seems as though they at one time replaced one of the front brake drums. I did not bother to check the last one, as I was convinced they all needed replacing. After a discussion with Norm and the hub problems he experienced, I called and talked to Walt Bratton about his drums and hubs. Walt indicated many people send in their hubs, which he said are over 5 thousands out of tolerance and instead of shims, it is better to replace them. Since this made perfect sense, and due to the difficulty of taking the hubs off the drums, I chose to get them as a set which are machined true after assembly. Later I ordered new shoes with liners already attached. On one of my rear brakes, it looked like they had stacked liners and riveted them both on the shoe to the make them thick enough to make contact with the drum.
Eventually all the parts came in and I began to rebuild the brakes. (Oh, I also ordered the rear drums with the bearings and seals installed and greased - ready to install.)
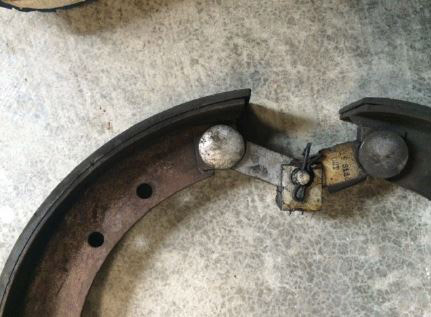
Now to pull the rear plates and get them ready for new shoes. Read though the directions - sounds easy enough, start pulling bolts. That is until you have almost everything undone and discover you cannot get the emergency brake arm to go through the eye of the rear radius arm. After multiple tries, I gave up and took off the emergency brake arm and took off the rear plate. I removed them one at a time so I had a model to look at of the right way to put everything back. I was able to arc the shoes to fit the drums using a bench mounted belt sander. I ordered new cams which did not fit in the holes - probably from another country. I assembled all the parts and of course could not get the emergency brake arm though the wye. So off came the arm and on went the backing plate. Then the arm went on like clockwork - until I got to the return spring. After a few hours, different trials, and a few choice words, I got the spring on. I then did the other side except I removed the radius arm to pull the drum. After rebuilding it on the bench, installed the arm then put it on the car along with the radius rod. All was looking good until I walked to the front of the car where I had placed all the clean parts. Here I discovered the return spring! Darn! Back to working for another hour to get the spring back on.
After installing the backing plates and the shoes and parts on the front, it became time to install the drums. The front went on but seemed a bit tight - even with the adjusting wedges all the way out. Then the left rear would not go on at all. I studied the problem and finally decided the new linings and drums, although arced correctly, were too thick. That meant off with the rear backing plates again - or at least the left one as the right one fit. I pulled the plate and sanded down the linings. This time I used the backing plate assembly and fit it to the drum to be sure it was the correct size - which I should have done in the first place. (Brake rebuilders take note!)
I then reassembled them and went through the same tedious process on the return springs. With all in place I decided to use the new method from the Model A Times to adjust them. After driving it to the BVA meeting, I went back to the old method of adjusting the brakes, and this time all worked just fine - FINALLY! I can stop again!
NOTE: About two weeks after I installed the last return spring, I discovered an article in the Model A Restorer magazine titles "Emergency Brake Return Spring Installation," by Les Andrews. It is on the September/October 2013 issue on page 8. Guess if I had kept up with my reading I would have remembered it!
Note 2: I discovered a better way to rebuild backing plates -when they are in a raffle at a Texas Tour, buy a ticket and win a set!
Bob Hensz is a member of the Brazos Valley A's, a vintage Model A Club, located in Bryan-College Station, Texas.